Settings done on Hyper's Client App
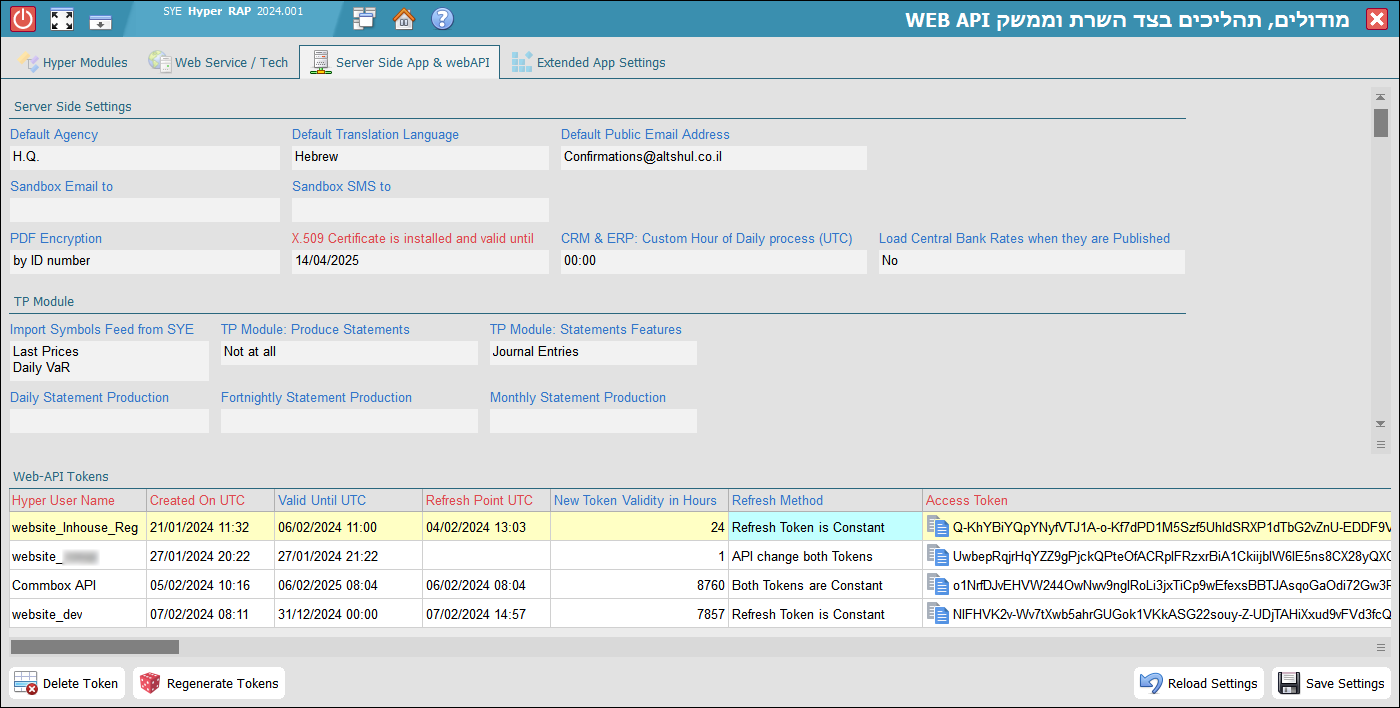
According to your authorization level, use hyper to control the website Headers, Email content and other settings.Start in "Server Side Tasks & web-API":

First fields in this screen shot are explained in this page.
These are the fields that affect Web Application behavior:
| Field Name | Description |
|---|---|
| Default Agency |
This is the default branch which will be used to "plug holes" in any operation where there is no link to the entity or the branch,
including a default time zone for a local clock. When creating a new Client Lead or doing any task that does not assigned to an Entity... the web-app will use this default Agency. |
| Default Translation Language | This is the default language of the website and API tables, until the web user select any specific language. |
| Default Public Email Address |
This will be the default outgoing mail address, from the Public Mailboxes list.
Some modules will select a different mailbox, according to assigned Entity (by agency). |
| Website English Title |
This is the HTML Title for any page produced by this web-app, unless the software module override it.
Usually we put the organization name / main brand in English. |
| Website Session Timeout # Minutes | The session will remain open for # minutes after last HTTP transaction, for both HTML and API interfaces. |
| Website Account Verification | If you wish to verify new client's cellphone number (by SMS) OR/AND EMail address, set this field. |
| Website Login System | Define how the client will identify himself, as described on the Login Page. |
| Website Login OTP | "One Time Password" gives you another layer of security if credentials were leaked, as described on the Login Page. |
| Website Registration Steps |
These are possible flows for "off the shelf" on boarding site... the order of the items is like in the registration process.
|
| Accept Client Age above # years | Allow you to block new client registration (or new lead post) by Birthday field. |
| Website Payments Interface |
Allow payment for e-commerce OR Deposit money into client account.
For further information, please read the Online Payments Interface chapter. |
| Website Limit New Client Payment |
|
| Website Withdraw Request Page |
|
Website Features
Use this setting (field) to enable functionality of the web-app, on both HTML & API:| Function Name | Description |
|---|---|
| Companies on Gender Fields |
The default Gender fields on hyper, include the obvious : "Male", "Female" and then "Private Company" and "Public Company".
If you select this option, then the possible genders for selection will be Male and Female". |
| Create a Live Account | This is the registration page for creating a real account (New Client Lead). |
| Documents Module |
The documents page is used for viewing and uploading the required documents (files) from the client.
You can make this page READ-ONLY by selecting the next option. |
| Personal Info & Docs in READ ONLY mode | If you select this item, you block the ability to modify personal information (including Contact Persons table) and to upload docs. |
| Account Journal | A report page which displays the client bookkeeping journal entries. |
| PDF Storage | A report page which displays the client statements, Invoices, Receipts etc. It's a PDF list with an option to download. |
| Customer Service | On this page the client can submit a new service tickets and view previous tickets with their handling status. |
| Internal Mail | The Incoming Messages page, displays internal messages for the client, from "hyp_Website Mail to Clients" table. |
| Trading Reports |
Depending on the type of your activity, pages with trading reports will appear on the website, one page for each table.
This is good for companies working with CFD (like MetaTrader), Real Foreign Exchange Trades, Crypto Assets etc. |
| Does_Entity_Exist_json | Be careful: This API function allow external apps to search inside hyper Index: Clients, Suppliers, Users (employees) and all contact persons. |
| Direct_Client_Entity_json | Be careful: This API function allow external apps to read and write any field of a Client Entity (access 6 tables per client number). |
Web-API Tokens
New records in the hyp_Web API Tokens table, will be created by the applications themselves (part of the Init process).| Field Name | Description |
|---|---|
| Hyper User Name | The web application user name. Automatically saved by the Web-API engine. |
| Created On UTC | The record creation date and time (UTC). |
| Valid Until UTC |
The expiry date of the Access Token. This value can be set manually, or calculated automatically according to "New Token Validity in Hours" value. |
| Refresh Point UTC | Last time that the "Access Token" was regenerated by the API or manually by Admin user. |
| New Token Validity in Hours | On creation the initial default value is: 1 hour. It can be set manually by the system Admin (values range 1 to 8760). Upon change the "Valid Until UTC" field is calculated automatically. |
| Refresh Method |
This option impacts the the regeneration of the tokens when calling the "RefreshToken" function: Refresh Token is constant = Only the Access Token will Re-generate. API change both Tokens = Re-generate Both Tokens for better security. NOT recommended when having multiple 3rd parties accessing the same API engine! Both Tokens are constant = The "RefreshToken" API call will not change the Tokens. |
| Access Token |
A 120 characters string based temporary token.
Click on the icon to copy it to the clipboard. |
| Refresh Token |
A 200 characters string based token. The refresh token validity never expires, but regenerates according to "Static Refresh-Token Value".
Click on the icon to copy it to the clipboard. |
|
Prev Access Token Prev Refresh Token |
A backup copy of both previous tokens. Exist to allow 2 extra minutes (according to "Refresh Point UTC") of access after the "RefreshToken" API call was executed. This is good for threads that did not reach their refresh point. Or, in case the Client failed to keep the new token, it has one more chance to run the "RefreshToken" function, with the previous known "Refresh Token" in his possession. |
Let's describe the buttons at the bottom of the page:
|
|
This button update the 2 fields from the Tokens table: [Valid Until UTC] and [New Token Validity in Hours], and then Sends a refresh msg to the API System, to reload the new tokens. |
|---|---|
|
|
Delete the selected row in the tokens table (has no connection to the 'Save' button), and then Sends a refresh msg to the API System, to reload the new tokens. |
|
|
This button creates new "Access Token" & "Refresh Token" as follows:
1. Backup Previous tokens. 2. Generate new tokens (regardless of the state of the "Static "Refresh-Token" Value" field)! 3. Update the [Refresh Point UTC] and [Valid Until UTC] fields. 4. Send a refresh msg to the API System, to reload the new tokens. |
Website Client Fields Matrix
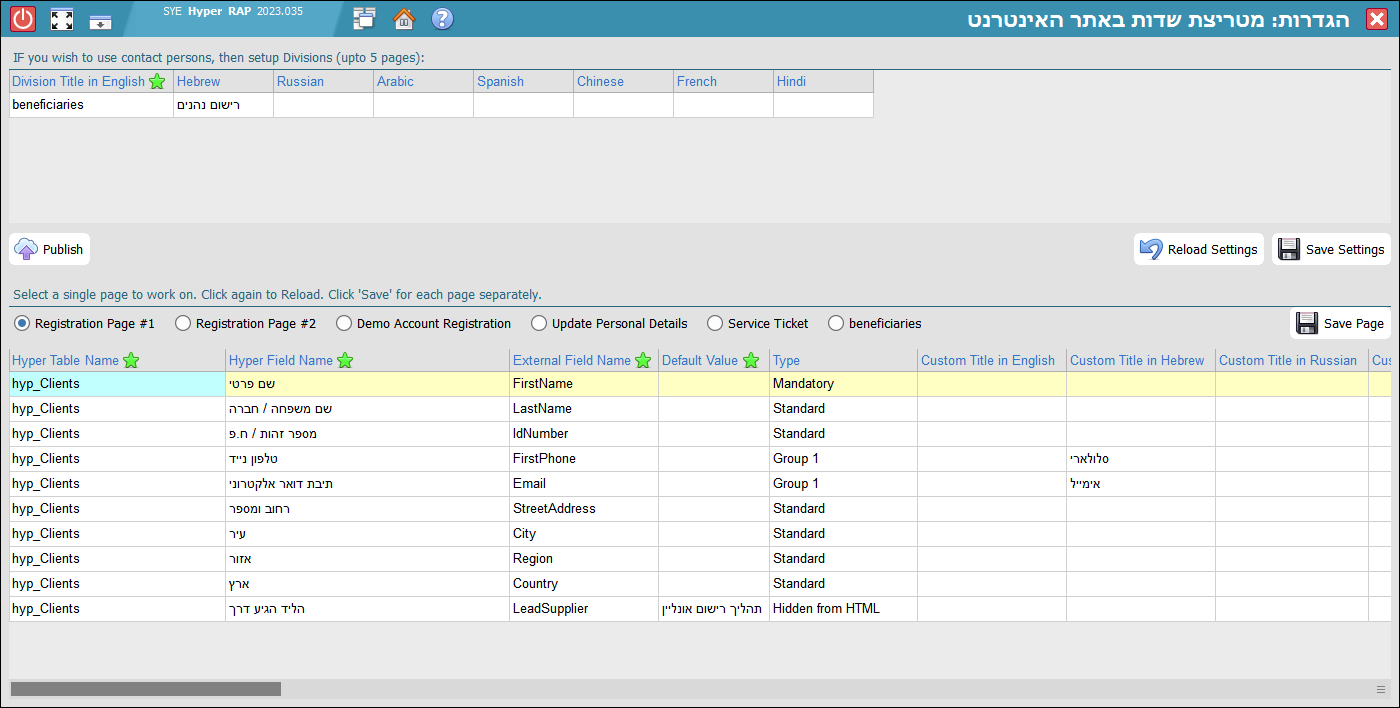
In this frame, you define which fields will be available on each web page (Html form & json API).Start your setting by setting the necessary fields in the relevant page as explained hereby.
|
|
In this page you set the fields that are relevant for a "New Client" or "New Lead" registration process. The fields on this page will be:
|
|---|---|
|
|
In this page you set the fields for an extended online registration process of a New Client. This page isn't mandatory but if defined, it will follow the previous page in the portal (HTML) registration process. |
|
|
In this page to set the fields that will be displayed on the registration page of a "New Client" or "New Lead" to a demo account/service portal. Just like "Registration Page #1", these fields will be copied into a new client + sales opportunity records. |
|
|
In this page you set the fields that will be available in the "Personal Details" page in the client's Service Portal. |
|
|
In this page to set the fields that will be available to the end user on the "Contact US" page in the client's Service Portal. |
The next image shows an implementation example:

For each field you set on the relevant page, you have to select one of the following option:
- Standard Field: The selected field will be displayed in this page.
- Mandatory Field: The selected field will be displayed in this page, as mandatory field.
- Group #: All fields with the same Group Number will be displayed in this page, and one of them must be field.
- Read Only: The selected field will displayed but cannot be changed (even if included in update post).
- Hidden from HTML: The selected field will NOT be displayed. This is useful for setting a default value in a registration process.
The order of the fields here, will be the order in the Html / json. Use right-click pop-up menu to change rows order.
Action Buttons
|
|
Triggers the Web-API system to reload saved settings / changes. |
|---|---|
|
|
Reloads the Contact Persons Divisions table settings from Hyper DB. |
|
|
Saves the Contact Persons Divisions table settings to Hyper DB. |
|
|
Saves all the settings done to the fields in the pages described above. |
Special function fields
Only for HTML pages, beside the"hyp_Clients"
table, you can select some function fields:
| Field Name | Description |
|---|---|
| Confirm Email | This field is used for verifying the Email Address field on the Html form. |
|
Password Confirm password |
Allow the user to set his own password (at least 8 characters long and contain 2 digits and 3 letters). |
| Accept Commercial Info Checkbox |
Use this function to setup both [Accept Commercial Info to Cell phone] and [Accept Commercial Info to Email] values at once.
|
| Agree to Terms Checkbox |
This function setup a time stamp in table "hyp_Clients Website Ext. Record" field [Last Contract Signing at UTC] .
|