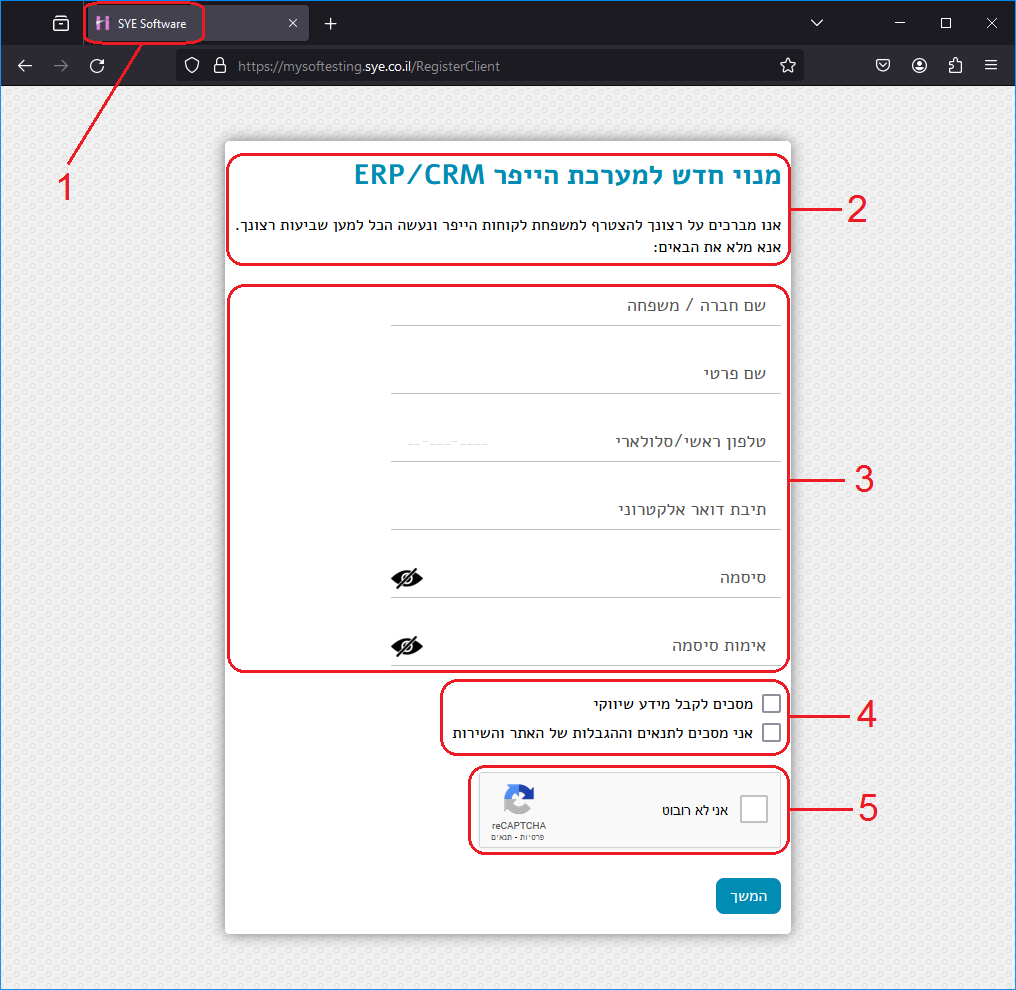
Registration (sign-up) page
The Web-App registration page is designed to onboard new clients into the Hyper CRM module as part of a multi-stage registration process.The feature is available only when
[Website Features]
includes Create a Live Account
.
When a visitor opens Domain/RegisterClient, Hyper builds the page dynamically from "text content" and the "fields matrix".
The page is responsive and is rendered as a standard HTML form with a captcha and a submit button.
This page can do ONE of three different things:
- Create a brand new client record.
- Merge the input into an existing lead when the existing record is still in an early handling stage.
- Keep the existing active client unchanged, while storing the new input as a follow-up sales opportunity.
Page Structure
The following explanation describes how a Hyper system administrator can control and adjust the page content.
1. Browser Page Title
Set the browser page title in the [Website English Title] field, as explained here. The icon file is loaded frommedia/icon.ico
.
2. Page Header
Set the page header by configuring the 'Register_Client_Page1' record key in Hyper's Website Content Module.Everything you configure there, such as the company logo, page title, and text, will be reflected in the header section.
3. Page Fields
Configure the required fields and their translations in Hyper's Fields Matrix page.The Web-App displays the fields in the exact order they appear within the Fields Matrix table.
4. User Consent (I Agree) Checkboxes
The "User Consent" checkboxes are generated automatically and placed after the fields area (#3) if you add one or more of the following fields to the Fields Matrix.Use the "Override Captions" tool to turn these checkbox titles into other text that includes a link to an appropriate content page.
- [Accept Commercial Info to Cellphone]: Displayed as a checkbox to the user. It saves the current Date and Time in Hyper and sets the [Question to use cell phone] field value to 1 (Website Form).
- [Accept Commercial Info to Email]: Displayed as a checkbox to the user. It saves the current Date and Time in Hyper and sets the [Question to use Email] field value to 1 (Website Form).
- [Accept Commercial Info Checkbox]: Provides dual consent via a single question. Displays one checkbox to the user but updates all four related fields mentioned above.
- [Agree to Terms Checkbox]: Represents the "Website Terms and Conditions". Displayed as a checkbox to the user and saves the Date and Time in Hyper.
5. Security CAPTCHA
Implement a Google security CAPTCHA by configuring the fields, as explained here.If Google CAPTCHA is not implemented, the default system CAPTCHA will appear automatically. This feature cannot be overridden!
Passing Values on Initial Page Load
During the initial call to this page (before the session cookie is established), you can append field values to be automatically populated into the HTML Form.Hidden fields from the Matrix can only be populated at this stage. Once the session is established, these fields become blocked.
You can use either HTTP GET or POST requests; both function identically.
A common use case for this feature is passing AdTech or Chatbot data for CRM royalties reporting.
GET /RegisterClient?LeadSupplier=CompanyWebsite&gclid=Cj0...Y8z&utm_source=google&utm_medium=cpc&utm_campaign=summer24&utm_term=in_quotes&utm_content=red_banner HTTP/1.1
Host: example.com
User-Agent: Mozilla/5.0 (Windows NT 10.0; Win64; x64)
Accept: text/html
Referer: https://www.google.com/
* Any supplementary input fields excluded from the Fields Matrix are stored within the hyp_Sale Opportunity Web Input table.
Form Submission
The following actions occur when this form is submitted. The process will halt upon encountering an error and display a message to the end user.- Verify that String field values match the acceptable languages defined in the global CRM configuration.
- Ensure all mandatory fields are filled out.
- If an Email field is included, verify that the address format is valid. This includes running a DNS MX test for private domains.
- If a Phone Number field is included, confirm it contains only digits and is between 9 and 13 characters long.
-
If a Birthday field is included, verify that the client's age meets the minimum requirement set in [Website Accept Client Age above # years].
-
If a Password field is included, it must be at least 8 characters long, containing at least 2 digits and 3 letters.
When using exclusively English characters, combining uppercase and lowercase letters is mandatory. -
If an ID Number field is included, perform a logical validation test when applicable (e.g., the Luhn algorithm).
The test relies on the[Country Issuing ID]client field if available; otherwise, it defaults to the[Country]field.
If both fields are empty, the system assumes the client resides in the organization's or branch's operating country. - If a Confirm Password field is included, ensure its value matches the Password field exactly.
- If a Confirm Email field is included, ensure its value matches the Email field (this check is not case-sensitive).
- Validate the CAPTCHA test (default or Google reCAPTCHA). If validation fails, reload the HTML page with the entered field values, allowing the user to try again.
- Perform a WAF (Web Application Firewall) check to see if this exact input (JSON or form) was already posted within the last hour. If true, abort and return Error Code 30.
-
Duplicity Check
-
Search for existing clients matching the provided Email Address, Phone Number, or ID Number.
If the index module fails to respond, halt the entire process and return Error Code 24. -
In the RARE case that a client record is found with a matching ID but a different Email or Phone Number,
halt the process and redirect the user to the'login'page with the following popup message:
'You have already registered before with different details. Please contact customer service to correct the registration.' -
If duplicity is found, perform a secondary check on the client's "Handling Status".
IF the status is < 4 (0-3), the first found record is MERGED with the newly registered data.
Any field that cannot be merged is pushed into the [hyp_Sale Opportunity Web Input] table to prevent data loss. - IF the status is > 3 (4-6), ALL new data is pushed directly into the [hyp_Sale Opportunity Web Input] table.
-
Search for existing clients matching the provided Email Address, Phone Number, or ID Number.
-
Create a New Client Record
-
Populate specific [hyp_Clients]table fields:
Set[Docs & Forms Language]to the current session language.
Set[Use Currency by Default]to the default bookkeeping currency.
Set the[Lead Status]field to 1 (Newly Created) and[Last Lead Input]to NOW (UTC). -
Determine which Agency to assign to this client, using the following priorities:
-
IF either [Default Sales Agent]or[Default Relationship Manager]fields were provided, assign the client to that agent's agency!
-
IF [Agency]was provided (not null), assign the client to it.
- Use the default field value if defined in the Matrix.
- Fallback to the default agency for this API instance (every Domain is linked to a 'Hyper User' or 'Server-side Agency').
-
IF either
-
Set the [Created on]field to the current local time based on the agency's timezone.
-
IF the "Accept Commercial Info" OR "Accept Commercial Info to Cellphone" checkbox was submitted as true/1:
Set[Accept Commercial Info to Cell phone]to the current local time, and set[Question to use cell phone]to 1 (Website Form). -
IF the "Accept Commercial Info" OR "Accept Commercial Info to Email" checkbox was submitted as true/1:
Set[Accept Commercial Info to Email]to the current local time, and set[Question to use Email]to 1 (Website Form). -
Configure [hyp_Clients Website Ext. Record]fields:
-
Set [Last Registration Step]and[Registration Complete Until Step]to 1 (Page 1).
-
Set [First Reg. Page Date]to Today. Set[Account Status]to 1 (Pending Approval).
-
Generate an [API Password].
IF the Matrix includes the[Password]field under the[hyp_Clients]table, copy it to[Portal Password]. -
IF the "Agree to Terms and Conditions" checkbox was submitted as true/1, set [Agree to Terms check-box]to Today.
-
Set
This concludes the client creation phase. The data is now saved to the database. The process continues to Step #15. -
Populate specific
-
Merging Data with Client LEAD (Status 0-3)
-
Copy each newly posted field to the base tables [hyp_Clients]and[hyp_Clients Record Extension]ONLY when the target field is EMPTY!
Otherwise, push the posted field into the [hyp_Sale Opportunity Web Input] table. -
Update specific [hyp_Clients]table fields:
-
Change [Docs & Forms Language]to the current session language.
-
IF empty, set [Use Currency by Default]to the default bookkeeping currency.
-
IF [Handling Status] = 3(Not Interested), reset it to 0 (New).
-
Set the [Lead Status]field to 2 (HOT Lead) or 3 (Interested Again), depending on the current client status.
-
Change
-
Complete any empty fields in the [hyp_Clients Website Ext. Record]table to meet the standards outlined in Section 12.F.
-
Copy each newly posted field to the base tables
-
Handling Data when Client is Confirmed / Active (Status 4-6)
Push all posted fields into the [hyp_Sale Opportunity Web Input] table.
Set the[hyp_Clients.Lead Status]field to 3 (Interested Again). -
A new Sale Opportunity is created at this point. It includes a link to the Client Number (new or existing) and populates empty fields using the Client record (e.g., phone, email, sales agent).
This step executes regardless of whether the previous step (client create/update) failed due to a database error. -
Email/Phone Verification
Based on the[Website Account Verification]field in the Hyper "...Web API" settings, the portal sends a verification link.
Approving this verification updates the[EMail Verification Status]and[Phone Verification Status]fields within the "hyp_Clients Website Ext. Record" table. -
Seamless Login when Client Already Exists
-
Depending on the 'Website Login System' field (server-side settings), for passwordless logins ('ID + Email + OTP'), the user is redirected to the 'Login_2FA'page.
-
If the password entered in the registration form differs from the one already stored in the account,
the user is redirected to the'PasswordRecovery'page and shown this popup message:
'You have already registered before with different details. Please use the password recovery tool to re-enter your account.' -
If the user successfully reaches this point, they are transferred to either the 'Login_2FA'page OR the'Portal'.
-
Depending on the 'Website Login System' field (server-side settings), for passwordless logins ('ID + Email + OTP'), the user is redirected to the
Thank you for reading.