Setting Website Client Fields Matrix
This frame allows you to define which fields will be available on each web page when the Web-App operates as a Web Portal, and which fields will be available to the API "Register" function.The following image shows an implementation example:
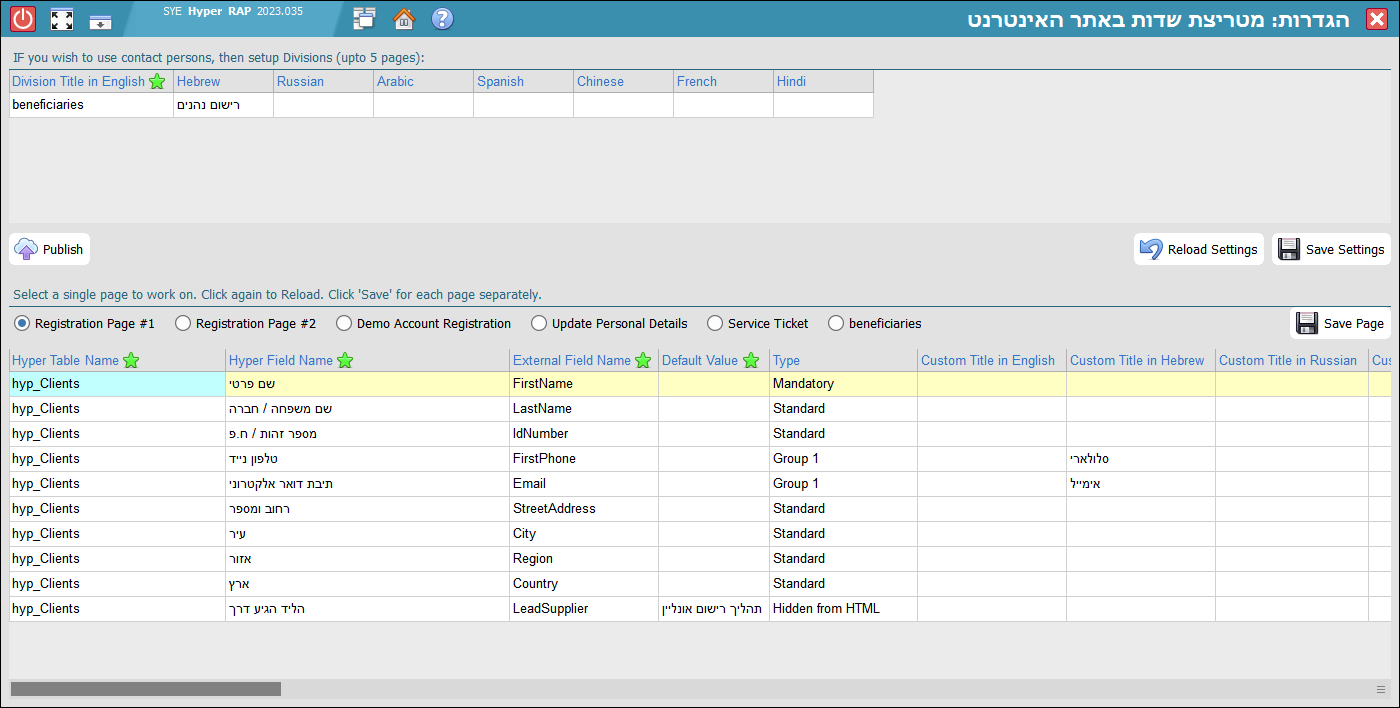
The following pages can be configured by selecting the corresponding radio button. Each selection loads a unique field matrix:
|
|
In this page, you set the fields that are relevant for a "New Client" or "New Lead" registration process in the portal and the API "Register" function.
The fields on this page will be:
|
|---|---|
|
|
In this page, you set the fields for an extended online registration process for a New Client.
This page is not mandatory, but if defined, it will follow the previous page in the portal (HTML) registration process only. |
|
|
Fields list for the "Register_Client_Json" API call. |
|
|
In this page, you set the fields that will be available on the "Personal Details" page within the client's Service Portal. |
|
|
In this page, you set the fields that will be available to the end-user on the "Contact Us" page within the client's Service Portal. |
Special Function Fields
Only for "Registration Pages", in addition to the[hyp_Clients]
table, you can select specific function fields:
| Field Name | Description |
|---|---|
| Confirm Email | This field is used to verify the Email Address field on the HTML form. |
|
Password Confirm Password |
Allows the user to set their own password (must be at least 8 characters long and contain 2 digits and 3 letters). |
| Accept Commercial Info Checkbox |
Use this function to configure both [Accept Commercial Info to Cell phone] and
[Accept Commercial Info to Email] values simultaneously.
This function field is also available for the [hyp_Client Contacts] table. |
| Agree to Terms Checkbox |
This function creates a timestamp in the field [hyp_Clients Website Ext. Record].[Last Contract Signing at UTC] .
|
Contact Person Dynamic Pages
If you wish to manage different types of contact persons, you can define up to 5 Divisions in the upper grid.Each division defined here will automatically generate an additional configuration button in the "Pages" area (e.g. "Beneficiaries" in the screenshot above).
This allows you to create specific field matrices for different roles or categories of contact persons within your portal.
Multi-Language Support
To support a global client base, the system allows you to define titles in 8 different languages:English, Hebrew, Russian, Arabic, Spanish, Chinese, French, and Hindi.
Localization is applied in two areas:
- Division Titles: Set the translated names for contact person categories in the upper grid.
- Custom Field Titles: In the main field matrix, you can provide a unique label for each language. These labels will be displayed to the end-user based on their portal language settings.
Acceptable Input Languages
Each of the fields above will pass through a character filter, according to Hyper's Global Definitions.
Field Type
For each field you set on the relevant page, you must select one of the following options:- Standard Field: The selected field will be displayed on this page.
- Mandatory Field: The selected field will be displayed on this page and marked as required.
- Group #: All fields with the same Group Number will be displayed on this page, and at least one of them must be filled.
- Read Only: The selected field will be displayed but cannot be changed (even if included in an update post).
- Hidden from HTML: The selected field will NOT be displayed. This is useful for setting a default value during a registration process.
The order of the fields here will determine their order in the HTML / JSON. Use the right-click pop-up menu to change the row order.
Action Buttons in this page
|
|
Triggers the Web-API system to reload the saved settings and changes. |
|---|---|
|
|
Reloads the Contact Persons Divisions table settings from the Hyper DB. |
|
|
Saves the Contact Persons Divisions table settings to the Hyper DB. |
|
|
Saves all the settings applied to the fields within the pages described above. |